クラウドインフラ構築記

現在AWSの構築支援に携わっております。今注視しているのは、GKE、BigQuery、Google Dataflowなどサービスを展開しているGoolge Cloud Platformです。

2018年6月24日
から hiruta
nginx + php-fpm + cloudsql proxyのPodを作成手順メモ #gcpja はコメントを受け付けていません

nginx + php-fpm + cloudsql proxyのPodを作成手順メモ #gcpja

nginx + php-fpm + cloudsql proxy のコンテナで構成されたPod、External Load BalancerのServiceを構築したときのメモになります。

Kubernets Enginesを作成します。Preemptible VM Nodeで作成しています。

 gcloud container clusters create test-cluster --machine-type=g1-small --network=product-network --subnetwork=prod-asia --preemptible 

CloudSQLへの接続ユーザ情報からsecretを作成しておきます。

 kubectl create secret generic cloudsql-db-credentials --from-literal=username=proxyuser --from-literal=password=xxxxx 

CloudSQL Admin、CloudSQL Client、CloudSQL Editorの権限を持つIAMを作成、credentials.jsonを取得します

 kubectl create secret generic cloudsql-instance-credentials --from-file=credentials.json=credentials.json 

各構成しているnginx、php-fpmは下記を参考に作成しました。

GCRにイメージをpushする前にGCRと認証済みにしておき必要があります。以下コマンドを実行しておきます。

 gcloud auth configure-docker 

docker pushするには、下記も必要になります。

 docker login -u oauth2accesstoken -p "$(gcloud auth print-access-token)" https://asia.gcr.io 


Pod構成ファイルの作成

 apiVersion: extensions/v1beta1
kind: Deployment
metadata:
name: mysql-client
labels:
app: mysql-client
spec:
template:
metadata:
labels:
app: mysql-client
spec:
containers:
- name: web
image: asia.gcr.io/[project-id]/nginx:latest
ports:
- containerPort: 8080
env:
- name: WORDPRESS_DB_HOST
value: 127.0.0.1:3306
# These secrets are required to start the pod.
# [START cloudsql_secrets]
- name: WORDPRESS_DB_USER
valueFrom:
secretKeyRef:
name: cloudsql-db-credentials
key: username
- name: WORDPRESS_DB_PASSWORD
valueFrom:
secretKeyRef:
name: cloudsql-db-credentials
key: password
# [END cloudsql_secrets]
- name: php-fpm
image: asia.gcr.io/[project-id]/php-fpm:latest
ports:
- containerPort: 9000
# Change <INSTANCE_CONNECTION_NAME> here to include your GCP
# project, the region of your Cloud SQL instance and the name
# of your Cloud SQL instance. The format is
# $PROJECT:$REGION:$INSTANCE
# [START proxy_container]
- name: cloudsql-proxy
image: gcr.io/cloudsql-docker/gce-proxy:1.11
command: ["/cloud_sql_proxy",
"-instances=[project-id]:asia-east1:web2-db=tcp:3306",
"-credential_file=/secrets/cloudsql/credentials.json"]
volumeMounts:
- name: cloudsql-instance-credentials
mountPath: /secrets/cloudsql
readOnly: true
# [END proxy_container]
# [START volumes]
volumes:
- name: cloudsql-instance-credentials
secret:
secretName: cloudsql-instance-credentials
# [END volumes] 

Service用構成ファイルの作成

 apiVersion: v1
kind: Service
metadata:
name: web
spec:
ports:
-
port: 80
targetPort: 8080
selector:
app: mysql-client
type: LoadBalancer

Podから作成しておきます。

  kubectl create -f deployment.yaml 
  kubectl create -f service-web.yaml 

https://kubernetes.io/docs/tasks/access-application-cluster/create-external-load-balancer/ にも記載されている通り、SSL termination する場合は、Ingress resourceが必要になります。

2018年5月13日
から hiruta
[StandardSQL] 過去スナップショット参照方法について #gcpug はコメントを受け付けていません

[StandardSQL] 過去スナップショット参照方法について #gcpug

Legacy SQLのTable Decorators に該当するものが、Standard SQLにないものか

issue https://issuetracker.google.com/issues/35905931のコメントをみて、発見したことですが、FOR SYSTEM TIME AS OFというものがあることが判明

https://cloud.google.com/bigquery/docs/reference/standard-sql/query-syntax#from-clause

制限

FROM句で、ARRAY scan、UNNEST operator、WITH句によって定義されたtable expressionも使えない。

過去7日のタイムスタンプである必要がある、もちろん、未来日付はNG

データリカバリの確認

 bq query --use_legacy_sql=false 'DELETE FROM dlp_output.earthquake_data WHERE true' 

と過去データレコードを全部削除ののち、

 bq query --destination_table xxxxxxxxxxxxxx:dlp_output.earthquake_data --append --use_legacy_sql=false 'SELECT * FROM dlp_output.earthquake_data FOR SYSTEM TIME AS OF TIMESTAMP_SUB(CURRENT_TIMESTAMP(), INTERVAL 1 HOUR);'

Amazon Auroraにも、過去レコードに戻す機能(Amazon Aurora Backtrack)が最近リリースされましたが、
クラスタの内容を過去(72Hours)に戻してしまうので、クエリで過去の情報を確認するものではない。

https://aws.amazon.com/blogs/aws/amazon-aurora-backtrack-turn-back-time/

2018年3月26日
から hiruta
Google-Provided Templates #gcpug はコメントを受け付けていません

Google-Provided Templates #gcpug

Google Dataflow用のGoogleがテンプレートを提供してくれている。Dataflowをパラメータを指定することでDataflowを手軽に使うことができるものです。

現在提供されているテンプレートは以下となります。

  • WordCount
  • Cloud Pub/Sub to BigQuery
  • Cloud Storage Text to Cloud Pub/Sub
  • Cloud Pub/Sub to Cloud Storage Text
  • Cloud Datastore to Cloud Storage Text
  • Cloud Storage Text to BigQuery
  • Cloud Storage Text to Cloud Datastore
  • Bulk Decompress Cloud Storage Files

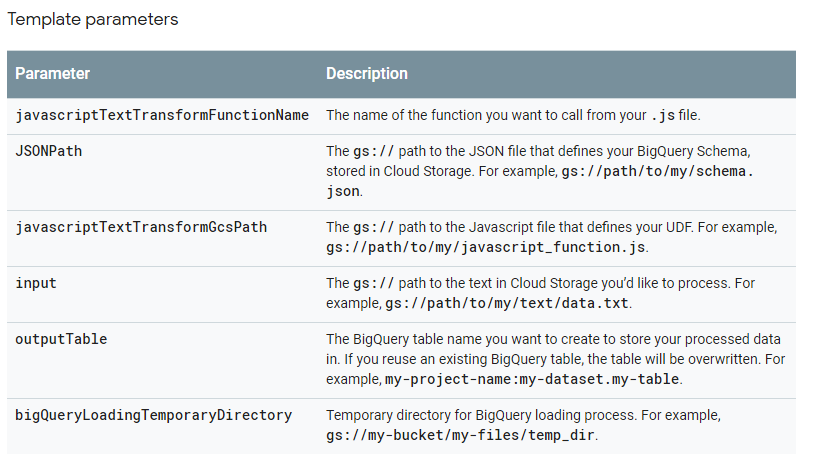
その中のCloud Storage Text to BigQuery について、

テンプレートで指定するパラメータは以下となっている。

実行方法として、Google Cloud Platform consoleもしくは、Google OAuth 2.0されたREST API で実行できます。

https://cloud.google.com/dataflow/docs/reference/rest/v1b3/projects.templates/launch#authorization


が、そのまま実行させると、inputパラメータを指定すると、invailidとなります。

outputTableの、my-project-nameは、project-idでないとprojectが見つからないと怒られます。

 {
"parameters": {
"javascriptTextTransformFunctionName": "transform",
"JSONPath": "gs://**********/schema.json",
"javascriptTextTransformGcsPath": "gs://**********/my_function.js",
"inputFilePattern": "gs://**********/*.csv",
"outputTable": "*************:testdataset.testtable",
"bigQueryLoadingTemporaryDirectory": "gs://**********/tmp"
},
"jobName": "test-job",
"environment": {
"tempLocation": "gs://**********/temp",
"zone": "us-central1-f"
}
}

テンプレートのソースを確認しても、InputFilePatternパラメータが必須となっているので、inputFilePatternの間違いであるのは確実です。

2018年2月25日
から hiruta
GCS Triggerイベントから返される値がおかしい #gcpug はコメントを受け付けていません

GCS Triggerイベントから返される値がおかしい #gcpug

GCS Triggerイベントから返される値が、おかしい場合がある。

以下簡単なコードを用意し、

 exports.bqbilling =function(event,callback) {
const file = event.data;
console.log(' file ', file); }

以下でfunctionsをデプロイを行いました。

 gcloud beta functions deploy bqbilling --trigger-resource upload_bucket_us --trigger-event google.storage.object.finalize 

以下2パターンでGCSバケットにコピーしてみました。

 gsutil cp billing-2018-02-23.json gs://upload_bucket_us 
 gsutil cp billing-2018-02-23.json gs://upload_bucket_us/billing-2018-02-23.json 

後者が、下記file.nameに、billing-2018-02-23.json/billing-2018-02-23.jsonと重複して入ってしまう。

 file : { bucket: 'upload_bucket_us', contentLanguage: 'en', contentType: 'application/json', crc32c: 'oV5QaA==', etag: 'CICXiNWhwNkCEAE=', generation: '1519534106348416', id: 'upload_bucket_us/billing-2018-02-23.json/billing-2018-02-23.json/1519534106348416', kind: 'storage#object', md5Hash: 'YhMH7RRG8oPxYj1lTapNBw==', mediaLink: 'https://www.googleapis.com/download/storage/v1/b/upload_bucket_us/o/billing-2018-02-23.json%2Fbilling-2018-02-23.json?generation=1519534106348416&alt=media', metageneration: '1', name: 'billing-2018-02-23.json/billing-2018-02-23.json', selfLink: 'https://www.googleapis.com/storage/v1/b/upload_bucket_us/o/billing-2018-02-23.json%2Fbilling-2018-02-23.json', size: '67081', storageClass: 'NEARLINE', timeCreated: '2018-02-25T04:48:26.346Z', timeStorageClassUpdated: '2018-02-25T04:48:26.346Z', updated: '2018-02-25T04:48:26.346Z' } 

gcloudは、190.0.1(最新版)で試しました。

2018年2月24日
から hiruta
Cloud Functions Storage Triggers 仕様変更について #gcpug はコメントを受け付けていません

Cloud Functions Storage Triggers 仕様変更について #gcpug

Cloud Functions Storage Triggersの仕様が、object.changeから変更になりました。

▪ **(MODIFIED)** The default trigger event behavior for
–trigger-bucket flag on the gcloud functions deploy command will soon
change. google.storage.object.finalize will replace
providers/cloud.storage/eventTypes/object.change as default trigger
event. To opt-in to the new behavior early, run gcloud config set
functions/use_new_object_trigger True.

Functions新仕様でのデプロイコマンドになります。trigger-resourceとtriiger-eventを指定するようになります。

 gcloud beta functions deploy bqbilling --trigger-resource prd-billing --trigger-event google.storage.object.finalize 

Cloud FunctionsとAWS Lambdaのイベントトリガーの比較は以下となります。

Cloud Functions AWS Lambda
オブジェクト作成 google.storage.object.finalize s3:ObjectCreated:*
オブジェクト削除 google.storage.object.delete s3:ObjectRemoved:*
オブジェクトアーカイブ時 google.storage.object.archive

※versioning有効化バケットのみ

s3:ReducedRedundancyLostObject
オブジェクトメタデータ更新 google.storage.object.metadataUpdate

AWS Lambdaの場合、Metadataを編集(追加)すると、ObjectCreatedでLambda Functionsが呼び出される。(Putだとトリガーは発動しない)

GCS オブジェクトのメタデータ更新された場合も検知することができる。

 $ curl -X PATCH --data-binary @meta.json -H "Authorization: Bearer XXXXXXXXXXXXXXXXXXXXXXXXXXXXXXXXXXXXXXXXXXXXXXXXXXXXXXXXXXXXXXXXXXXXXXXXXXXXXXXXXXXXXXXXXXXXXXXXXXXXXXXXXXXXXXXXXXXXXXXXXXXXXX" -H "Content-Type: application/json" "https://www.googleapis.com/storage/v1/b/[gcs bucket]/o/[object]" 

GCS オブジェクトのメタデータ更新時もFunctionsが動作します。


–stage-bucket も指定不要になり、管理外のバケット(?)にzipをアップロードしているようにみられる。gcf-upload-us-central1-<ランダム文字列>。cliでデプロイすると、sourceUploadUrlに表示されます。

2018年2月18日
から hiruta
ACME v2でLet’s Encryptのワイルドカード証明書を発行してみました。 はコメントを受け付けていません

ACME v2でLet’s Encryptのワイルドカード証明書を発行してみました。

ACME v2用のacme.shが試せるようになりました。

ACME v2はacme.shのマスタブランチにマージ済みので、(https://community.letsencrypt.org/t/acme-v2-is-merged-in-to-master-branch-of-acme-sh/52242
下記でACME v2用のスクリプトを取得できます。

 curl https://get.acme.sh | sh 
 acme.sh --test --dns --issue -d *.totalsolution.biz 

_acme-challenge.totalsolution.bizのTXTレコードを更新したあと、renewコマンドを実行する

 acme.sh --renew -d *.totalsolution.biz 

gcloud compute ssl-certificates createで証明書を登録

ACME v1と変わらず利用できました。


ただし、ACMEv2用のルート証明書は、現状ブラウザの信頼済みストア証明書ではないので、
2/27に、production V2 API endpointが使用されるまでは、テストのみで試しておくのがいいかと。

https://community.letsencrypt.org/t/staging-endpoint-for-acme-v2/49605

ACME v2正式リリースは遅れる見込み。

https://community.letsencrypt.org/t/acmev2-and-wildcard-launch-delay/53654

2018年2月17日
から hiruta
Cloud KMSによるBigQuery dataプロテクト #gcpug はコメントを受け付けていません

Cloud KMSによるBigQuery dataプロテクト #gcpug

CloudKMS keyによるBigQuery データセット保護が、generally availableになりました。

一部制限があるので注意が必要です。

  • CloudKMS keyのリージョンとBigQuery データセットが同じである必要がある
    • CloudKMS keyにはglobal、マルチリージョン(us、asia、europe)には対応していない

Cloud KMS keyとBigQueryのデータセットが異なると以下エラーとなります。

The location
for the specified Cloud KMS key is us-central1. This location is not supported
for the BigQuery dataset location EU. Please select a Cloud KMS key in one of
the supported Cloud KMS locations: europe-west1, europe.

Encrypter/Decrypter roleをもったService Accountを登録する必要があります。

Service Account名は、GCPのプロジェクトにより異なります。bq show –encryption_service_accountで確認することができます。

このService Accountを削除してしまうと、Cloud KMSに紐づいたデータセットに対して、アクセスできなくなります。

 bq load --destination_kms_key projects/XXXXXXXXXXXXXXXXXXX/locations/us-central1/keyRings/bqprotectkey/cryptoKeys/key testdataset.emi010000_2 gs://upload_bucket_us/emi010000.csv schema.json
 bq query --use_legacy_sql=false --destination_kms_key projects/XXXXXXXXXXXXXXXXXXX/locations/us-central1/keyRings/bqprotectkey/cryptoKeys/key " SELECT name FROM testdataset.newtable "

bq copyにより、CloudKMS keyを紐づいたまま、テーブルをコピーすることが可能です。

最近対応したDDLでもCloudKMSを有効化できます。CloudKMS keyを変更することも。


As BigQuery provides managed storage, long-term inaccessible data is not compatible with BigQuery’s architecture. If the Cloud KMS key of a given BigQuery table is not available and not accessible for 60 consecutive days, BigQuery may choose to delete the table and its associated data. Before the data is deleted, BigQuery will send an email to the email address associated with the billing account at least 7 days before the deletion.

Cloud KMS keyがavailableでない場合、60日連続して続いた場合、データが削除されるかもしれない。53日前にはメールで通知があるようだが。


2017年12月3日
から hiruta
インターリージョンVPCピアリング #aws #jawsug はコメントを受け付けていません

インターリージョンVPCピアリング #aws #jawsug

インターリージョンVPCピアリングがサポートされたので、スループットを計測してみました。

インターリージョンVPCピアリングのサポートのお知らせ

現状東京リージョンは対応していないので、USオレゴン(us-west-2)とUSオハイオ(us-east-2)間になります。

インスタンスタイプは、t2.medium(オハイオだとm3.mediumが使えない。。)、計測ツールはiperf3を使いました。

まずは、VPC Peering経由しない場合

 [ 4] 0.00-10.00 sec 72.2 MBytes 60.6 Mbits/sec 131 sender
[ 4] 0.00-10.00 sec 70.6 MBytes 59.2 Mbits/sec receiver
 [ 4] 0.00-10.00 sec 72.2 MBytes 60.6 Mbits/sec 131 sender
[ 4] 0.00-10.00 sec 70.6 MBytes 59.2 Mbits/sec receiver
[ 4] 0.00-10.00 sec 96.3 MBytes 80.7 Mbits/sec 214 sender
[ 4] 0.00-10.00 sec 94.7 MBytes 79.4 Mbits/sec receiver

次に、VPC Peering経由

 [ 4] 0.00-10.00 sec 79.1 MBytes 66.3 Mbits/sec 302 sender
[ 4] 0.00-10.00 sec 77.4 MBytes 64.9 Mbits/sec receiver
 [ 4] 0.00-10.00 sec 52.3 MBytes 43.9 Mbits/sec 227 sender
[ 4] 0.00-10.00 sec 50.4 MBytes 42.3 Mbits/sec receiver
 [ 4] 0.00-10.00 sec 65.8 MBytes 55.2 Mbits/sec 310 sender
[ 4] 0.00-10.00 sec 63.9 MBytes 53.6 Mbits/sec receiver

上記の通り、Peering通さないほうが良くなる結果となった。internet gatewayを出ないので早くなると予想したが予想とは違う結果になった。

VPC Peeringの経路は1ホップであることは確認。

traceroute 172.22.1.114
traceroute to 172.22.1.114 (172.22.1.114), 30 hops max, 60 byte packets
1 ip-172-22-1-114.us-west-2.compute.internal (172.22.1.114) 69.081 ms 71.186 ms 70.115 ms


GCPのus-central1とus-west1間のスループットを追加しました。

 [ ID] Interval Transfer Bandwidth Retr
[ 4] 0.00-10.00 sec 825 MBytes 692 Mbits/sec 1 sender
[ 4] 0.00-10.00 sec 824 MBytes 691 Mbits/sec receiver
 [ ID] Interval Transfer Bandwidth Retr
[ 4] 0.00-10.00 sec 638 MBytes 535 Mbits/sec 41 sender
[ 4] 0.00-10.00 sec 637 MBytes 534 Mbits/sec receiver
[ ID] Interval Transfer Bandwidth Retr
[ 4] 0.00-10.00 sec 827 MBytes 694 Mbits/sec 0 sender
[ 4] 0.00-10.00 sec 826 MBytes 693 Mbits/sec receiver

AWSに比べて、リージョン間でも一桁違うスループットを記録。


2017年12月2日
から hiruta
S3 Selectを試してみた #aws #jawsug はコメントを受け付けていません

S3 Selectを試してみた #aws #jawsug

re:invent 2017で発表されたS3 Selectのpreview が通ったので、試してみました。

※S3 Selectはプレビュなので、将来仕様が変わる場合があります。

試したのは、Python SDK 2.7になります。

必要なモジュールは、boto3と、下記からダウンロード、カレントフォルダに展開する必要があります。

 wget http://s3select.s3-website-us-east-1.amazonaws.com/public/python/aws-python-sdk-s3-select-preview-1.0.0.zip

サポートされているリージョンは、下記となっており、東京リージョンのS3 bucketは対応していません。

米国東部 (バージニア北部)、米国東部 (オハイオ)、米国西部 (オレゴン)、欧州 (アイルランド)、およびアジアパシフィック (シンガポール)

S3 Selectをサポートしていないリージョンを指定すると、下記エラーメッセージが表示されます。

 botocore.exceptions.ClientError: An error occurred (MethodNotAllowed) when calling the SelectObjectContent operation: The specified method is not allowed against this resource.

サンプルコード


import boto3
from s3select import ResponseHandler
import os
import sys

class PrintingResponseHandler(ResponseHandler):
def handle_records(self, record_data):
print(record_data.decode('utf-8'))

args = sys.argv;

CURRENT_DIR = os.path.abspath(os.path.dirname(__file__))
MODELS_DIR = os.path.join(CURRENT_DIR, 'models')
os.environ['AWS_DATA_PATH'] = MODELS_DIR

expression = args[1]

s3 = boto3.client('s3','us-west-2')
response = s3.select_object_content(
Bucket='xxxxxx',
Key='401307influenza.csv',
SelectRequest={
'ExpressionType': 'SQL',
'Expression': expression ,
'InputSerialization': {
'CompressionType': 'NONE',
'CSV': {
'FileHeaderInfo': 'IGNORE',
'RecordDelimiter': '\n',
'FieldDelimiter': ',',
}
},
'OutputSerialization': {
'CSV': {
'RecordDelimiter': '\n',
'FieldDelimiter': ',',
}
}
}
)

handler = PrintingResponseHandler()
handler.handle_response(response['Body'])

所感

  • S3でGZIPされたファイルに対しても、実行することが可能
  • CSVの場合、Ⅰ行目を抜いて、COUNTしてくれました
  • AVG、SUM、MAX、MINなども使えるとなっているが、現状使い方が悪いのかシンタックスエラーになってしまいます。(GROUP BYは未対応)
  • select s._4 from S3Object where _4 = ‘2017’ のようにselect句とwhere句に同じフィールドで実行するとエラーとなる
 botocore.exceptions.ClientError: An error occurred (InternalError) when calling the SelectObjectContent operation (reached max retries: 4): We encountered an internal error. Please try again.

日本語も表示することは可能(UTF-8に限られます)

現状暗号化されたS3 Objectには対応していない。

暗号化させて、S3 にアップロードして、

 aws s3api put-object --bucket xxxxx --key 401307influenza2.csv --body  401307influenza2.csv --server-side-encryption AES256 --debug

S3 Selectしたところ、以下エラーが返ります。

 botocore.exceptions.ClientError: An error occurred (UnsupportedEncryptionMode) when calling the SelectObjectContent operation: We do not support server side encryption. Please check the service documentation and try again.

あと、検索はフルスキャンになるか情報がなかったので、不明

2017年12月2日
から hiruta
Cloud IoT Coreについて #gcpug #gcpja はコメントを受け付けていません

Cloud IoT Coreについて #gcpug #gcpja

Cloud IoTを試してみました。Google Cloud Platform Advent Calendar 2017の二日目の記事になります。

Cloud IoT Coreは、現在パブリックβということで、今後仕様が変わる場合があります。現状のものについて記載しています。

Cloud IoT Coreは、Cloud PubSubと違うのは、MQTT(S)機能+デバイス管理機能と考えればいいかと

まず、new device registry 作成

gcloud beta iot registries create my-registry \
--project=my-iot-project \
--region=us-central1 \
--event-pubsub-topic=projects/my-iot-project/topics/device-events

選択可能なリージョン
us-central1
europe-west1
asia-east1

証明書によるデバイス接続となる。
Azure IoTにあるようなCloud IoT自体にIP制限等の機能はない

先日AWS IoTでは、X.509証明書なしでもOAuthのようなトークン認証には現状対応していません。

公開されているサンプルをベースにポイントを記載します。サンプルは下記gitからダウンロードできます。

https://github.com/GoogleCloudPlatform/nodejs-docs-samples.git

最初に、デバイスの証明書を発行

今回のリリースにより、Cloud IoT Coreの顧客は、自らのデバイス鍵を用意し、自身の認証局(CA)を使って署名しておくことで、Cloud IoT Coreの認証プロセスで該当鍵の署名を検証できるようになる。これによりデバイスメーカーは、自らのCAが発行した証明書を用いることで、デバイスをオフライン状態のままで一括して準備できるようになる

 openssl req -x509 -newkey rsa:2048 -keyout rsa_private.pem -nodes -out \
rsa_cert.pem -subj "/CN=unused"
openssl ecparam -genkey -name prime256v1 -noout -out ec_private.pem
openssl ec -in ec_private.pem -pubout -out ec_public.pem

デバイスの追加

gcloud beta iot devices create my-node-device \
--project=my-iot-project \
--region=us-central1 \
--registry=my-registry \
--public-key path=rsa_cert.pem,type=rs256

証明書の更新もgcloud beta iot devices credentials updateで行います


Cloud IoT Coreに接続するアプリを作成するには、まず以下Node.js moduleをインストールしておく
“jsonwebtoken”: “7.4.1”,
“mqtt”: “2.7.2” *

実際Cloud IoTに接続するために、利用するパッケージは、mqtt

一意のmqttClient idを付与
const mqttClientId = `projects/${argv.project_id}/locations/${argv.cloud_region}/registries/${argv.registry_id}/devices/${argv.device_id}`;
// With Google Cloud IoT Core, the username field is ignored, however it must be
// non-empty. The password field is used to transmit a JWT to authorize the
// device. The "mqtts" protocol causes the library to connect using SSL, which
// is required for Cloud IoT Core.
const connectionArgs = {
host: argv.mqtt_bridge_hostname,
port: argv.mqtt_bridge_port,
clientId: mqttClientId,
username: 'unused',
password: createJwt(argv.project_id, argv.private_key_file, argv.algorithm),
protocol: 'mqtts'

};

tokenをコネクションを張るごとにワンタイムパスワードを設定

 // Create a JWT to authenticate this device. The device will be disconnected
// after the token expires, and will have to reconnect with a new token. The
// audience field should always be set to the GCP project id.

MQTTS 接続部分

// Create a client, and connect to the Google MQTT bridge.
const client = mqtt.connect(connectionArgs);


client.on('connect', () =&gt; {
 console.log('connect', arguments);
 // After connecting, publish 'num_messages' messagse asynchronously, at a rate
 // of 1 per second for telemetry events and 1 every 2 seconds for states.
 publishAsync(1, argv.num_messages);
}); 

センサーデータを見立てて、jsonデータを生成

 const temperature = 20 + (Math.randam() * 15);
const humidity = 60 + (Mat&lt;span data-mce-type="bookmark" style="display: inline-block; width: 0px; overflow: hidden; line-height: 0;" class="mce_SELRES_start"&gt;&lt;/span&gt;h.random() * 20);
const data = JSON.stringify({
deviceId: 'my-node-device',
temperature: temperature,
humidity: humidity
});


 // Publish "payload" to the MQTT topic. qos=1 means at least once delivery.
// Cloud IoT Core also supports qos=0 for at most once delivery.
console.log('Publishing message:', payload);
client.publish(mqttTopic, data, { qos: 1 });


gcloud beta pubsub subscriptions pull --auto-ack projects/my-iot-project/subscriptions/my-subscription

https://cloud.google.com/pubsub/ordering?hl=ja

Cloud pubsub自体処理サーバがロードバランシングしているので、Google Cloud Pub/Sub では、高可用性と拡張性を持ったメッセージ配信サービスを使用できます。これらの機能を使用する場合の妥協点として、サブスクライバーによって受信されるメッセージの順序は保証されません。

時系列にソートさせるには、時刻のデータも一緒に送信させる仕組みは必要

projects/my-iot-project/topics/device-events をトリガーにCloud Functions、Google dataflow等に発火することができる。

/**
* Triggered from a message on a Cloud Pub/Sub topic.
*
* @param {!Object} event The Cloud Functions event.
* @param {!Function} The callback function.
*/

exports.subscribe = function subscribe(event, callback) {
// The Cloud Pub/Sub Message object.
const pubsubMessage = event.data;


// We're just going to log the message to prove that
// it worked.
console.log(Buffer.from(pubsubMessage.data, 'base64').toString());
// Don't forget to call the callback.
callback();
};

Cloud IoT Coreは、現在のところ、東京リージョン(asia-northeast1)にきていないので、IoT device間レイテンシーが気になる。

※日本から最も近いCloud IoT CoreのEdgeはasia-east1(台湾)

さらに、IoTデバイスの最新状態を取得する必要がある顧客は、最後に報告された状態やデバイスのプロパティを含む、物理デバイスの論理表現を管理できるようになる。こういったことを実現するために、デバイスがオフラインになっていても、その状態やプロパティを取得したり、アップデートしたりするためのAPIが用意されている。

gcloud beta iot devices update
-blocked

https://cloud.google.com/sdk/gcloud/reference/beta/iot/devices/update

gcloud beta iot devices credentials update

https://cloud.google.com/sdk/gcloud/reference/beta/iot/devices/credentials/update