クラウドインフラ構築記

現在AWSの構築支援に携わっております。今注視しているのは、GKE、BigQuery、Google Dataflowなどサービスを展開しているGoolge Cloud Platformです。

2019年11月10日
から hiruta
pyenv/virtualenv環境で、Cloud Codeを使うには はコメントを受け付けていません

pyenv/virtualenv環境で、Cloud Codeを使うには

Visual Stdio Codeに、ptyhonをpyenvの仮想環境で使う場合、ちょっと設定が必要になります。

Google Cloud SDKが一部サブコマンド、python3に対応していないものがあるので、python 2.7を使う必要がある、かつ別で、python 3系を使いたい場合があるので、pyenvでpythonバージョンを切り替えて使っている。

pyenv -m venvはpython3になるので、ptyhon2系はこちらで、python仮想環境を作ります。

 pyenv -m virtualenv .env 

activateの確認。

 . .env/bin/activate 

VS Codeに、Cloud Codeのプラグインをインストールします。

https://cloud.google.com/code/docs/vscode/install?hl=en

Cloud Codeのプラグインをインストールできましたら、setting.jsonを編集します。

(pythonプラグインも必要です。)

python.pythonPathに、pyenv -m virtualenvでインストールしたpython pathを指定、ポイントになるのは、python.terminalactivateEnvironment をオンにすることです。

 {
"python.pythonPath": "/Users/hiruta/.venv/bin/python",
"python.venvPath": "~/.pvenv",
"python.terminal.activateEnvironment": true
}

Cloud Codeで、GKE Clusterを作成することができますが、すべてのオプションには対応していないようです。

Enable Istio、Enable Cloud Run for Anthosはありますが、preemptible VM、custom vpcは指定できるオプションは見つけられないようです。

2019年6月16日
から hiruta
BigQueryによる可視化、そして ML – “BigQuery GIS + ML on government open data” #gcpja #gcpug はコメントを受け付けていません

BigQueryによる可視化、そして ML – “BigQuery GIS + ML on government open data” #gcpja #gcpug

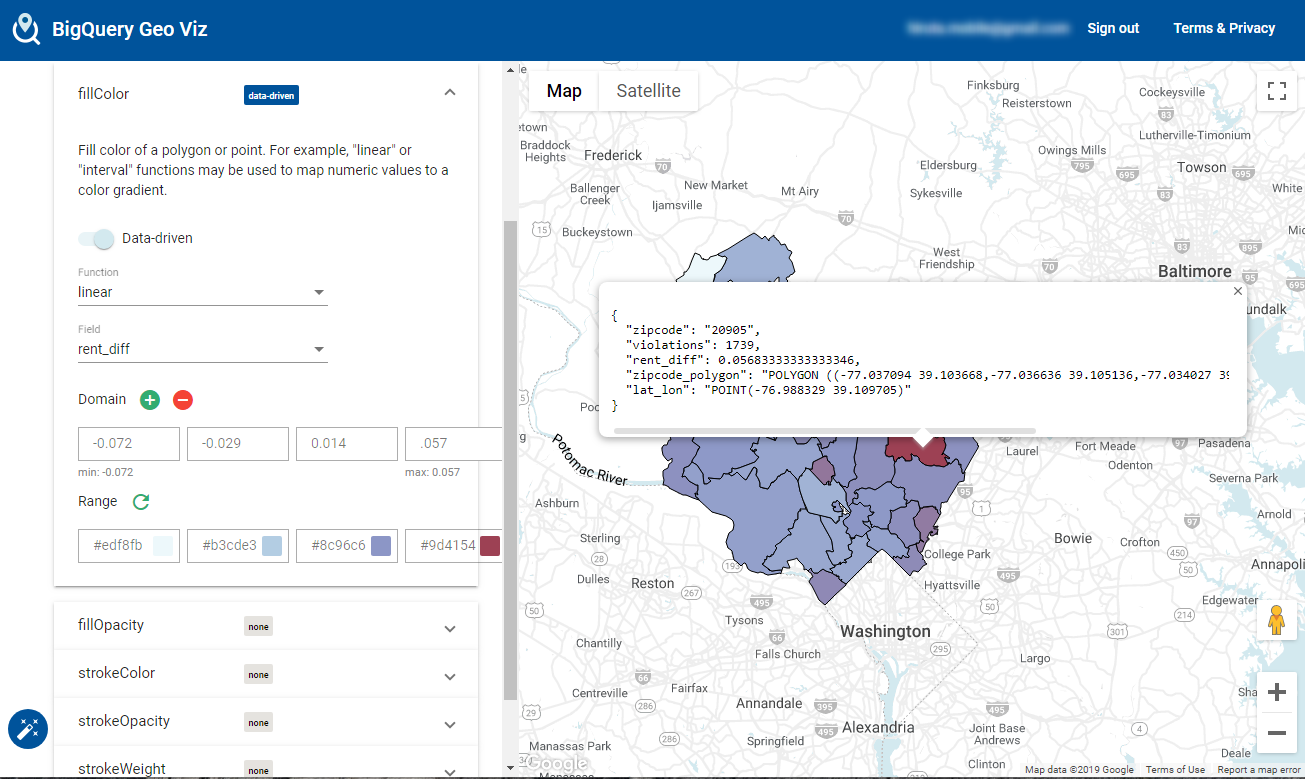
BigQuery (BigQuery Geo Viz)を使って、Average Rent Percent Difference From Previous Yearの平均をDataprepでのデータマイニング
から、BigQuery Geo Vizへの可視化、BigQueryMLによる学習、推論まで書かれています。

https://medium.com/@williszhang/bigquery-gis-ml-on-government-open-data-2605ed9d2e8

ここでは、DataprepのReceipeについていくつかポイントを記載します。

 extractpositions col: {Facility Address} type: last count: 6 

Facility Addressに、”4733 BRADLEY BLVD CHEVY CHASE MD 20815″ と入っているが、
文字列のlast(最後末)を抜き出すときReceipe

Extract by positions
このfunctionsはスペースはカウントされないので、下記でトリムしてやる必要がある。

 textformat col: zipcode type: trimwhitespace 
 filter type: custom rowType: single row: ISMISMATCHED(zipcode, ['Zipcode']) action: Delete 

filter関数。vaildな値かどうかを判定して、rowを削除するかのアクションを設定することができる。

https://cloud.google.com/dataprep/docs/html/ISMISMATCHED-Function_57344747

このブログの例だと、Zip codeチェックに使用しています。
他にも、電話番号、E-Mail、クレジットカード、IPアドレス、URL、日付時間等のチェックができる。

Code Violations CSV. Wrangle recipe について

 drop col: {Date Assigned}: Drop 

としているが、BigQueryに登録するschemaで、Date_Assignedを指定しているので、Too many columneとなり怒られてしまう。


Code Violations CSV. Wrangle recipeから、”drop col: {Date Assigned}: Drop” をDelete(削除)することでbq loadできることは確認しています。

最終的にこんな感じになります。

Dataprep ML学習させる前に、イレギュラーなデータを除去できるDataprepの有益性を改めて実感。

2019年6月9日
から hiruta
Cloud Endpoints for Cloud Functions #gcpug #gcpja はコメントを受け付けていません

Cloud Endpoints for Cloud Functions #gcpug #gcpja

BackendのCloud FunctionsのAPI managementできる Extensible Service Proxy(以下ESP)が可能に。
Google Accountによる認証、JSSON Web Token (JWT)などをESPで担うこともできる。
また、Cloud Endpointsにて、Quota制御なども

https://cloud.google.com/endpoints/docs/openapi/get-started-cloud-functions

Stackdriver loggingに下記が記録されているので、runtime自体nginxが動いていると思われる。

 2019-06-09 12:07:55.420 JST
2019/06/09 03:07:55 [warn] 1#1: Using trusted CA certificates file: /etc/nginx/trusted-ca-certificates.crt

手順は上記で使えるようになります。
ESP用のRuntimeを、Cloud Runでデプロイするようになります。

 gcr.io/endpoints-release/endpoints-runtime-serverless:1.30.0 

ENDPOINTS_SERVICE_NAMEを上記Cloud RunにデプロイしたRuntimeの環境変数に設定しておく必要があるが、
「Getting Started with Endpoints for Cloud Functions」のドキュメントには下記記載となっているが、ドキュメントが古いのか、configuurations updateコマンドはない。

 gcloud beta run configurations update \
--service CLOUD_RUN_SERVICE_NAME \
--set-env-vars ENDPOINTS_SERVICE_NAME=YOUR_SERVICE_NAME 

下記のようにする必要があります。

 gcloud beta run services update CLOUD_RUN_SERVICE_NAME \
--set-env-vars ENDPOINTS_SERVICE_NAME=YOUR_SERVICE_NAME 

Cloud FunctionsのIAM Supportで、Extensible Service Proxyからのトラフィックのみ通すこともできるようになります。
(ただし、本機能はαユーザのみ使うことが可能)

 gcloud alpha functions add-iam-policy-binding FUNCTION_NAME \
--member "serviceAccount:ESP_PROJECT_NUMBER-compute@developer.gserviceaccount.com" \
--role "roles/cloudfunctions.invoker" 

JSON Web Token (JWT)による認証で、service accountを使う例。

https://cloud.google.com/endpoints/docs/openapi/service-account-authentication

上記チュートリアル内で、roles/serviceAccountTokenCreaterを、service accountの権限に付与するのだが、gcloudだと以下エラーとなってしまう。
console上だと問題ないのだが。

 $ gcloud projects add-iam-policy-binding PROJECT_ID --member serviceAccount:hello-test@PROJECT_ID.iam.gserviceaccount.com --role roles/serviceAccountTokenCreater
ERROR: Policy modification failed. For a binding with condition, run "gcloud alpha iam policies lint-condition" to identify issues in condition.
ERROR: (gcloud.projects.add-iam-policy-binding) INVALID_ARGUMENT: Role roles/serviceAccountTokenCreater is not supported for this resource. 

JWT token認証スキップしようとすると、下記となり、バックエンド(Cloud Functions)に飛ばなくなります。

 {
"code": 16,
"message": "JWT validation failed: Missing or invalid credentials",
"details": [
{
"@type": "type.googleapis.com/google.rpc.DebugInfo",
"stackEntries": [],
"detail": "auth"
}
]
}

また、Auth0、Firebaseなどとも連携できます。
Using Firebase to authenticate users https://cloud.google.com/endpoints/docs/openapi/authenticating-users-firebase
Using Auth0 to authenticate users https://cloud.google.com/endpoints/docs/openapi/authenticating-users-auth0

JWT validationのサンプルは下記で公開されています。
https://cloud.google.com/endpoints/docs/openapi/service-account-authentication#python

2019年2月17日
から hiruta
Cloud Data Loss Prevention (DLP) APIをpython にて試してみました。 #gcpja #gcpug はコメントを受け付けていません

Cloud Data Loss Prevention (DLP) APIをpython にて試してみました。 #gcpja #gcpug

センシティブデータを検知、マスキングできるCloud Data Loss Prevention (DLP) APIを、pythonにて試してみた備忘録です。
Cloud DLP APIをおそらく、GCPしかなかったはず

まず、cloud DLP用のサービスアカウント作成します。

サービスアカウント作成

 gcloud iam service-accounts create dlp-api --display-name "dlp-api"

サービスアカウント用credentialsを発行

 gcloud iam service-accounts keys create ./key.json --iam-account dlp-api@xxxxxxxxxxxxxxxx.iam.gserviceaccount.com

dlp用の権限ロールを付与

 gcloud projects add-iam-policy-binding cms-production-1225 --member serviceAccount:dlp-api@xxxxxxxxxxxxxxxx.iam.gserviceaccount.com --role roles/dlp.user

gcloudで権限確認する場合は以下で。(gcloudでRequireされるpythonは2.7なので、DLPで必要なpythonとは差がある)

 gcloud auth activate-service-account --key-file key.json

Macとかローカル環境で試す場合は、環境変数にて

 export GOOGLE_APPLICATION_CREDENTIALS=../key.json

次に、Cloud DLP用のpyton moduleをインストール
https://googleapis.github.io/google-cloud-python/latest/dlp/index.html
Cloud DLPは、python 3.4以上をサポートしています。自分はpython 3.7.2で確認

https://googleapis.github.io/google-cloud-python/latest/dlp/index.htmlに記載しているサンプルコードそのままで動かなかった。上記サイトに記載しているサンプルは引数がAPIとは異なっているのが原因。ドキュメントのほうも更新してくれるといいのですが。

試したコードは以下になります。


from google.cloud import dlp_v2

client = dlp_v2.DlpServiceClient()

parent = client.project_path('xxxxxxxxxxxxxxxxxxx')
name = 'EMAIL_ADDRESS'
info_types_elements = {'name' : name }
info_types = [info_types_elements]
inspect_config = {'info_types' : info_types}

deidentify_config = {
'info_type_transformations': {
'transformations': [
{
'primitive_transformation': {
'character_mask_config': {
'masking_character': 'x',
'number_to_mask': 20
}
}
}
]
}
}
value = 'My email is not example@example.com , aaa@bbb.com , xxxx@xxxxx.co.jp '
items = {'value' : value }
response = client.deidentify_content(parent, deidentify_config,inspect_config, items)
print(response)

下記のようにメールアドレスをマスキングして出力してくれる。

 My email is not xxxxxxxxxxxxxxxxxxx , xxxxxxxxxxx , xxxxxxxxxxxxxxxx

取り込み時、Cloud Functions、Google dataflow等のロード処理で使ったりすると、マスキングしたデータができるので、本番そのまま検証に
もっていけないとかの場合に有益かと思います。

2019年1月20日
から hiruta
Stackdriver Trace for PHP で、wordpressサイトをモニタリングしてみました。 はコメントを受け付けていません

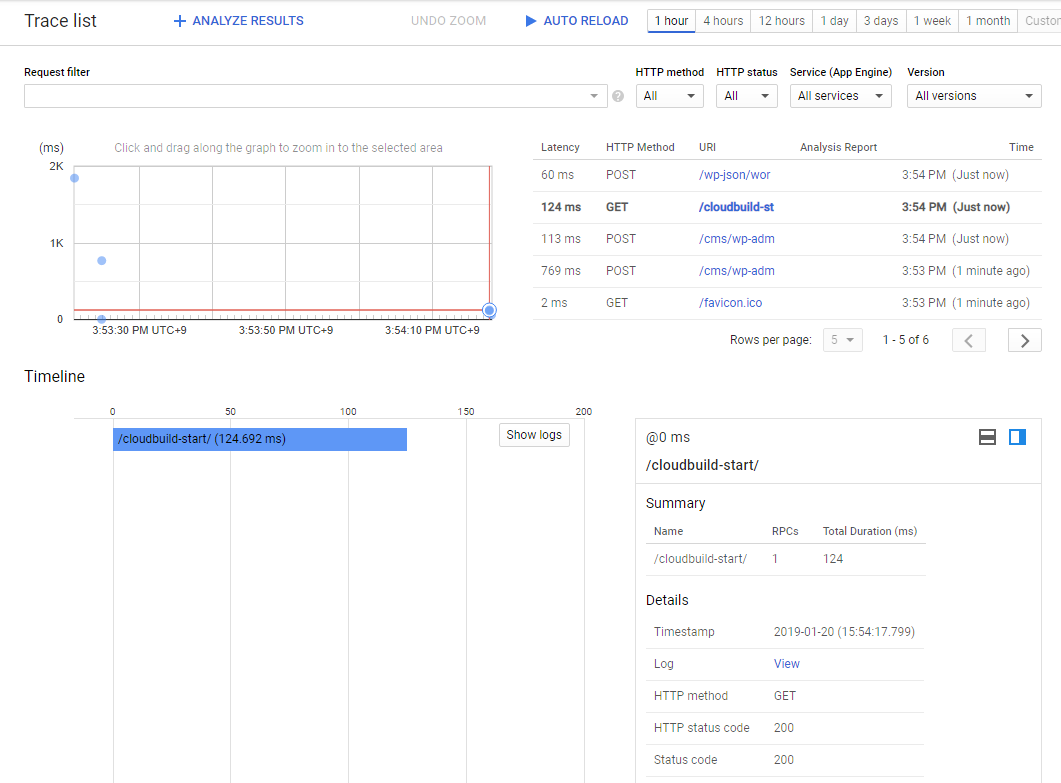
Stackdriver Trace for PHP で、wordpressサイトをモニタリングしてみました。

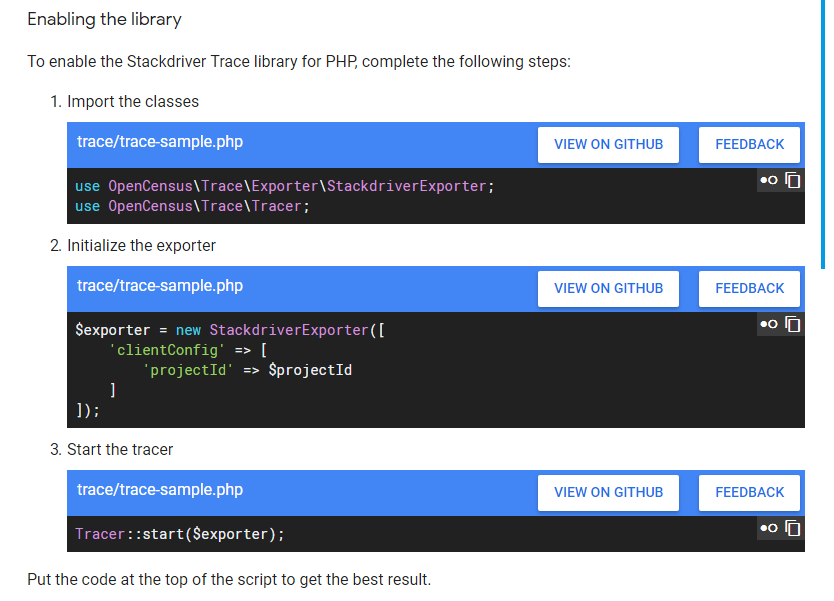
Performance insightツールである、Stackdriver Trace for PHPを自運営しているwordpress環境に
組み込んでみました。

別は下記を参照します。

https://cloud.google.com/trace/docs/setup/php

まず、OpenCensus extension をインストール
peclコマンドがない場合は、apt install php7.2-devにて入れます。(Ubuntu 18.04.1 LTSの場合)

opencensus-alphaは、php7以上でないとインストールできません。

次に、comoserコマンドにより、OpenCensus Stackdriver exporter composer packageをインストール
直下にvendorフォルダが作成されます。

wp-config.phpに、下記を書き込めばOKです。


( https://opencensus.io/api/php/integrating-wordpress/)

GCEインスタンスの場合、Cloud API access scopesにおいて、 Stackdriver Trace がアクセスできるようにしておく
必要があります。

2018年12月15日
から hiruta
CloudBuild 事始め はコメントを受け付けていません

CloudBuild 事始め

Container Builder 改め、CloudBuildについて、すこし試してみました。

CloudBuildの詳細についてはこちらです。
https://cloud.google.com/cloud-build/

CloudBuild用のコンテナを使って、CI処理を組んでいきます。対応ランタイムは下記となる。

Bazel、Curl、Docker、Dotnet、Gcloud、Git、Go、Gradle、Gsutil、Kubectl、Mvn、Npm、Wget、yarn

cloudbuild.ymlの例。Cloud Functionsのデプロイ例。Cloud Buildとリージョンちがくても問題はない。

 steps:
- name: gcr.io/cloud-builders/gcloud
args:
- "functions"
- "deploy"
- "http"
- "--entry-point=hello_test_http"
- "--region=us-central1"
- "--runtime=python37"
- "--trigger-http" 
 gcloud builds submit --config cloudbuild.yaml . 

権限周りではまったこを一点。

1度下記エラーがでたことがあった。

 Already have image (with digest): gcr.io/cloud-builders/gcloud
ERROR: (gcloud.beta.functions.deploy) ResponseError: status=[403], code=[Forbidden], message=[The caller does not have permission]
ERROR: build step 0 "gcr.io/cloud-builders/gcloud" failed: exit status 1

IAMの権限エラーによるものとなりますので、cloudbuildのserviceaccountに付与してやる必要がある

 gcloud iam service-accounts add-iam-policy-binding ${PROJECT}@appspot.gserviceaccount.com \
--member=serviceAccount:${NUM}@cloudbuild.gserviceaccount.com \
--role=roles/iam.serviceAccountUser --project=${PROJECT}

GCEインスタンスから、GCP APIを叩く場合も、同じく失敗することがあります。以前は大丈夫だったが、仕様が変更になったのか。

2018年12月4日
から hiruta
GCEのネットワークスループットについて はコメントを受け付けていません

GCEのネットワークスループットについて

16vCPUsのインスタンス(n1-standard-16)で同ゾーンでネットワークスループットを計算しました。

GCEのインスタンスの場合、以下のようにコア毎に2GBpsの制限がある。8コア以上のインスタンスタイプの場合、16GBpsに制限されている。g1-small等の「shared-core machine type」は1GBpsに制限されている。

https://cloud.google.com/vpc/docs/quota?authuser=0#per_instance

1多重でした結果

 hiruta@instance-2:~$ iperf3 -c 10.80.10.2
[ ID] Interval Transfer Bandwidth Retr
[ 4] 0.00-10.00 sec 10.2 GBytes 8.72 Gbits/sec 3647 sender
[ 4] 0.00-10.00 sec 10.2 GBytes 8.72 Gbits/sec receiver

1多重で8GBps!

16多重で


hiruta@instance-2:~$ iperf3 -c 10.80.10.2 -P 16

[SUM] 0.00-10.00 sec 16.3 GBytes 14.0 Gbits/sec 173799 sender
[SUM] 0.00-10.00 sec 16.3 GBytes 14.0 Gbits/sec receiver

しっかり、16Gbpsで制限かかっているようだ。

2018年11月20日
から hiruta
Generating Signed URLs をgsutilコマンドにて #gcpug はコメントを受け付けていません

Generating Signed URLs をgsutilコマンドにて #gcpug

Generating Signed URLsをgcloudでしてみました。

https://cloud.google.com/storage/docs/access-control/signing-urls-with-helpers

※aws s3 presignに相当する機能になります。

ConsoleではService accounsのページでservice account keysを作成できますが、gcloudでは、「roles/iam.serviceAccountKeyAdmin」を付与しないと、下記のエラーメッセージが出力されます。

$ gcloud iam service-accounts keys create ~/key.json --iam-account gcs-signurl2@xxxxxxxxxxxxxxxxxxx.iam.gserviceaccount.com
ERROR: (gcloud.iam.service-accounts.keys.create) PERMISSION_DENIED: Permission iam.serviceAccountKeys.create is required to perform this operation on service account projects/-/serviceAccounts/gcs-signurl2@xxxxxxxxxxxxxxxxxxx.iam.gserviceaccount.com.

まず、下記コマンドで権限付与しておく必要があります。

gcloud projects add-iam-policy-binding xxxxxxxxxxxxxxxxxxx --member serviceAccount:gcs-signurl@xxxxxxxxxxxxxxxxxxx.iam.gserviceaccount.com --role roles/iam.serviceAccountKeyAdmin

上記実行後に、gcloud iam service-accounts keys createコマンドを実行します。

次に、Generating Signed URLs with gsutilでテンポラリなURLを作成自体はできますが、テンポラリURLをブラウザからアクセスする場合、オブジェクトへの参照権限をサービスアカウントに付与しておく必要があります。

gcloud projects add-iam-policy-binding xxxxxxxxxxxxxxxxxxx --member=serviceAccount:gcs-signurl@xxxxxxxxxxxxxxxxxxx.iam.gserviceaccount.com --role=roles/storage.objectViewer

あとは、Generating Signed URLs with gsutilを実行すればテンポラリなURLを発行することができます。
(この場合10分間有効なURLとなります。)

$ gsutil signurl -d 10m Desktop/key.json gs://gcs-to-bigquery/2.5_month.csv
URL HTTP Method Expiration Signed URL
gs://gcs-to-bigquery/2.5_month.csv GET 2018-11-18 18:14:07

10分間経過すると下記エラーとなります。

<Error>
<Code>ExpiredToken</Code>
<Message>The provided token has expired.</Message>
<Details>
Request signature expired at: 2018-11-18T09:14:07+00:00
</Details>
</Error>

2018年7月29日
から hiruta
Cloud Functions To CloudSQL #gcpug はコメントを受け付けていません

Cloud Functions To CloudSQL #gcpug

Cloud Functionsから直接接続できます。(CloudSQL Direct Connect)

公式には、Node.js版しか記載されていませんが、GCP Next SF 2018 でβになったpython 3.7でも可能なので、ポイントを記載します。

公式のCloudSQL Direct Connectは以下を参照してください。

https://cloud.google.com/functions/docs/sql

functionsデプロイ時に必要なモジュールを記載。(mysql-connector-python)

requirements.txt

 google-cloud-logging==1.6.0
mysql-connector-python==8.0.11

次にコード

CloudSQL接続情報とかをまず設定します。unix socketに対して接続する設定になります。


import mysql.connector

connectionName = 'gcp-project-id:asia-east1:web2-db'
config = {
'user': 'dbuser',
'password': 'xxxxxx',
'unix_socket': '/cloudsql/' + connectionName,
'database': 'database'
}

Cloud Functions python 3.7 runtimeは、Flask microframeworkというフレームワークでコーディングします。

 def hello_sql(request):
"""HTTP Cloud Function.
Args:
request (flask.Request): The request object.
Returns:
The response text, or any set of values that can be tuned into a
Response object using `make_response
<http://flask.pocoo.org/docs/0.12/api/#flask.Flask.make_response>`.
"""
request_json = request.get_json()
if request_json and 'exec_cmd' in request_json:
exec_cmd = request_json['exec_cmd']

ここで、ポイント

Connection Poolに接続するのが、max connection を1にすること

Functionsはイベントトリブンなので、コネクションリソースを枯渇することを防ぐ上で。

公式にも以下記載されています。

When using a connection pool, it is important to set the maximum connections to 1. This may seem counter-intuitive, however, creating more than one concurrent connection per function instance may cause rapid exhaustion of connection resources (see Maximum Concurrent Connections below for more detail). Cloud Functions limits concurrent executions to 1 per instance. This means you will never have a situation where two requests are being processed by a single function instance at the same time, so in most situations only a single database connection is needed.


try:
cnx = mysql.connector.connect(pool_name="mypool",
pool_size = 1,
**config)
exec_cmd = cnx.is_connected()
if cnx.is_connected():
cur = cnx.cursor()
cur.execute('select * from wp_options limit 1 ')
result = cur.fetchall()
except:
exec_cmd = cnx.is_connected()
finally:
cur.close()
cnx.close()

return f'Hello, {result}!' 

αテスト時は、event handlingがでなくても、デバッグしづらかったのですが、最近、python コードのエラーも場合でも、functionsがcrashした場合でも、Trackbackが出るようになっています。

2018年7月16日
から hiruta
HTTPS用にIngress リソースの作成について はコメントを受け付けていません

HTTPS用にIngress リソースの作成について

Podsをexternalからアクセスさせるには、Serviceが必要になる。

上記Type LoadBalancer は、HTTPになるので、HTTPSは、Ingressを使う必要があります。

https://kubernetes.io/docs/concepts/services-networking/ingress/

IngressとPodの中継するため、NodePortを作っておきます。Ingressからヘルスチェックとして、NodePortを使います。

 kubectl expose deployment web-app --target-port=80 --type=NodePort 

Let’s encryptのSSL証明書はSecretsに登録しておきます。

 kubectl create secret tls custom-tls-cert 

ingress用のyaml

 apiVersion: extensions/v1beta1
kind: Ingress
metadata:
name: basic-ssl-ingress
spec:
tls:
- hosts:
- www.totalsolution.biz
secretName: custom-tls-cert
rules:
- host: www.totalsolution.biz
http:
paths:
- backend:
serviceName: web-app
servicePort: 80
path: / 

ヘルスチェックが通るまでしばらく時間がかかります。